JVM基本结构,内存分配
JVM的基本结构
一.类加载器(ClassLoader)
其作用是在程序运行时,将编译好的.class字节码文件装载到JVM的内存区域中.如下图所示流程,Java源码被编译器编译为字节码文件,字节码文件被类加载器加载到数据运行时区域(其实就是内存空间当中),然后再由执行引擎执行.class文件中的字节码指令.
二.执行引擎
执行.class字节码文件中的指令集,如果想了解class中的字节码指令,可以参考<<深入分析Java Web技术内幕>>的第5章深入class文件结构.
三.本地库接口(本地方法库)
我的理解这是JVM与本地操作系统交互的接口,调用一些由C语言等编写的本地方法,一般的开发者并不用细纠.
四.JVM内存区(运行时数据区)
这是JVM中非常重要的一部分,是Java程序运行时JVM所分配的内存区域,绝大部分开发者关注的重点都在此.
JVM的内存区域分为5大块,如下图所示.
1.虚拟机栈(Stack)
一般俗称栈区,是线程私有的.栈区一般与线程紧密相联,一旦有新的线程被创建,JVM就会为该线程分配一个对应的java栈区,在这个栈区中会有许多栈帧,每运行一个方法就创建一个栈帧,用于存储局部变量,方法返回值等.栈帧中存储的局部变量随着线程的结束而结束,其生命周期取决于线程的生命周期,所以讲java栈中的变量都是线程私有的.
2.堆(Heap)
真正存储对象的区域,当进行Object obj = new Object()这样一个操作时,真正的obj对象实例就会在heap中.
3.方法区(Method Area)
包含常量池,静态变量等,有人说常量池也属于heap的一部分,但是严格上讲方法区只是堆的逻辑部分,方法区还有个别名叫做非堆(non-heap),所以方法区和堆还是有不同的.
4.程序计数器(Program Couter Register)
用于保存当前线程的执行的内存地址.因为JVM是支持多线程的,多线程同时执行的时候可能会轮流切换,为了保证线程切换回来后还能恢复到原先状态,就需要一个独立的计数器,记录之前中断的位置,由此可以看出程序计数器也是线程私有的.
5.本地方法栈(Native Method Stack)
性质与虚拟机栈类似,是为了方便JVM去调用本地方法接口的栈区,此处开发者很少去关注,我也是了解有限,因此不深入探究其作用.
Elasticsearch Mapping Best Practice
Mapping 各字段的选型流程
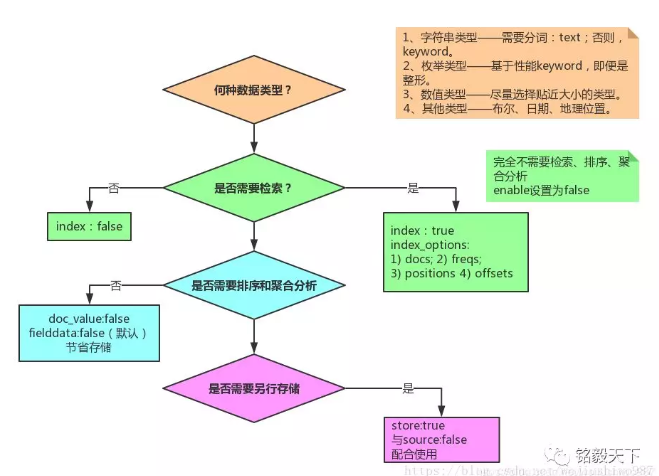
规则
elasticsearch 为了更好的让大家开箱即用,默认启用了大量不必要的设置,为了降低空间使用,提升查询效率,请按以下规则构建最佳的 Mapping
1. 禁用不需要的功能
不用查询,禁用 index
1 | PUT index |
不关心评分,禁用该功能
1 | PUT index |
不需要短语查询,禁用 index positions
1 | PUT index |
2. 不要使用默认的 Mapping
默认 Mapping 的字段类型是系统自动识别的。其中:string 类型默认分成:text 和 keyword 两种类型。如果你的业务中不需要分词、检索,仅需要精确匹配,仅设置为 keyword 即可。
根据业务需要选择合适的类型,有利于节省空间和提升精度。
1 | PUT index |
3. 考虑 identifiers 映射为 keyword
某些数据是数字的事实并不意味着它应该始终映射为数字字段。 Elasticsearch 索引数字的方式可以优化范围查询,而 keyword 字段在 term 查询时更好。
通常,存储诸如 ISBN 的标识符或标识来自另一数据库的记录的任何数字的字段很少用于范围查询或聚合。这就是为什么他们可能会受益于被映射为 keyword 而不是 integer 或 long。
参考
linux性能优化笔记之CPU篇
linux性能优化笔记之CPU篇
cpu优化用到的命令
- mpstat
进程相关统计工具,cpu/io可以同时对比 - vmstat
内存分析工具 - pidstat
进程分析工具 - perf 使用perf record -g -p < pid>和perf report就足够了
CPU篇
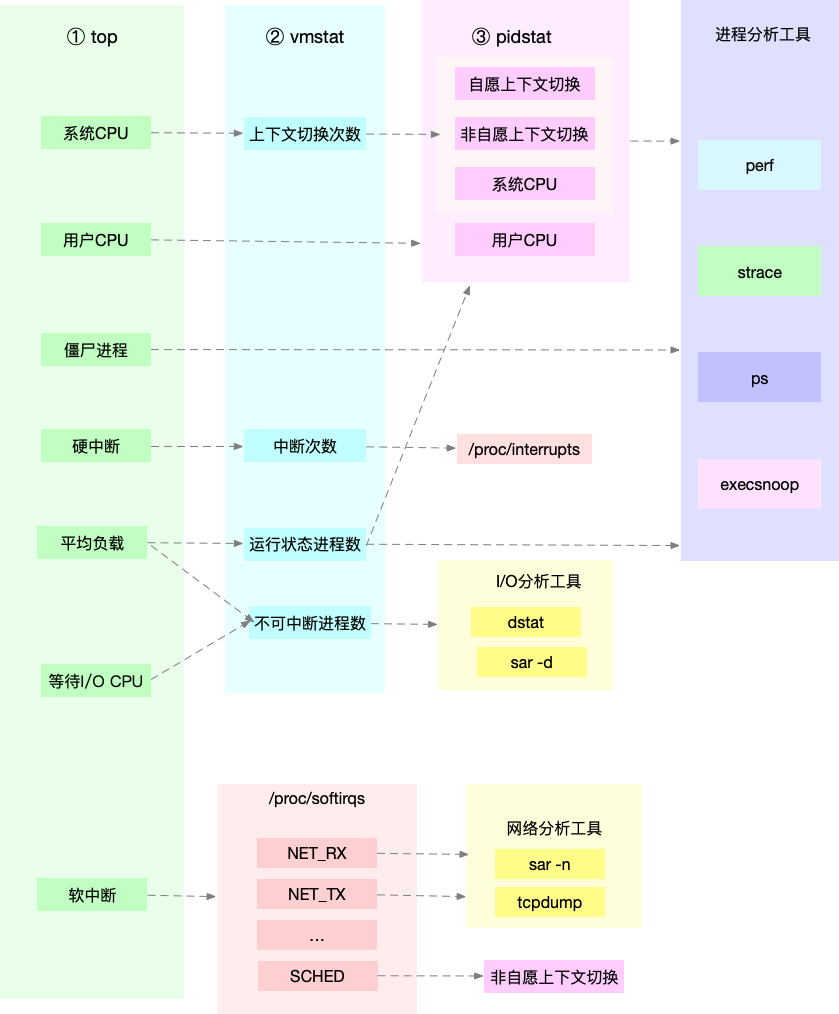
根据指标找工具
.png?raw=true)
根据工具查指标
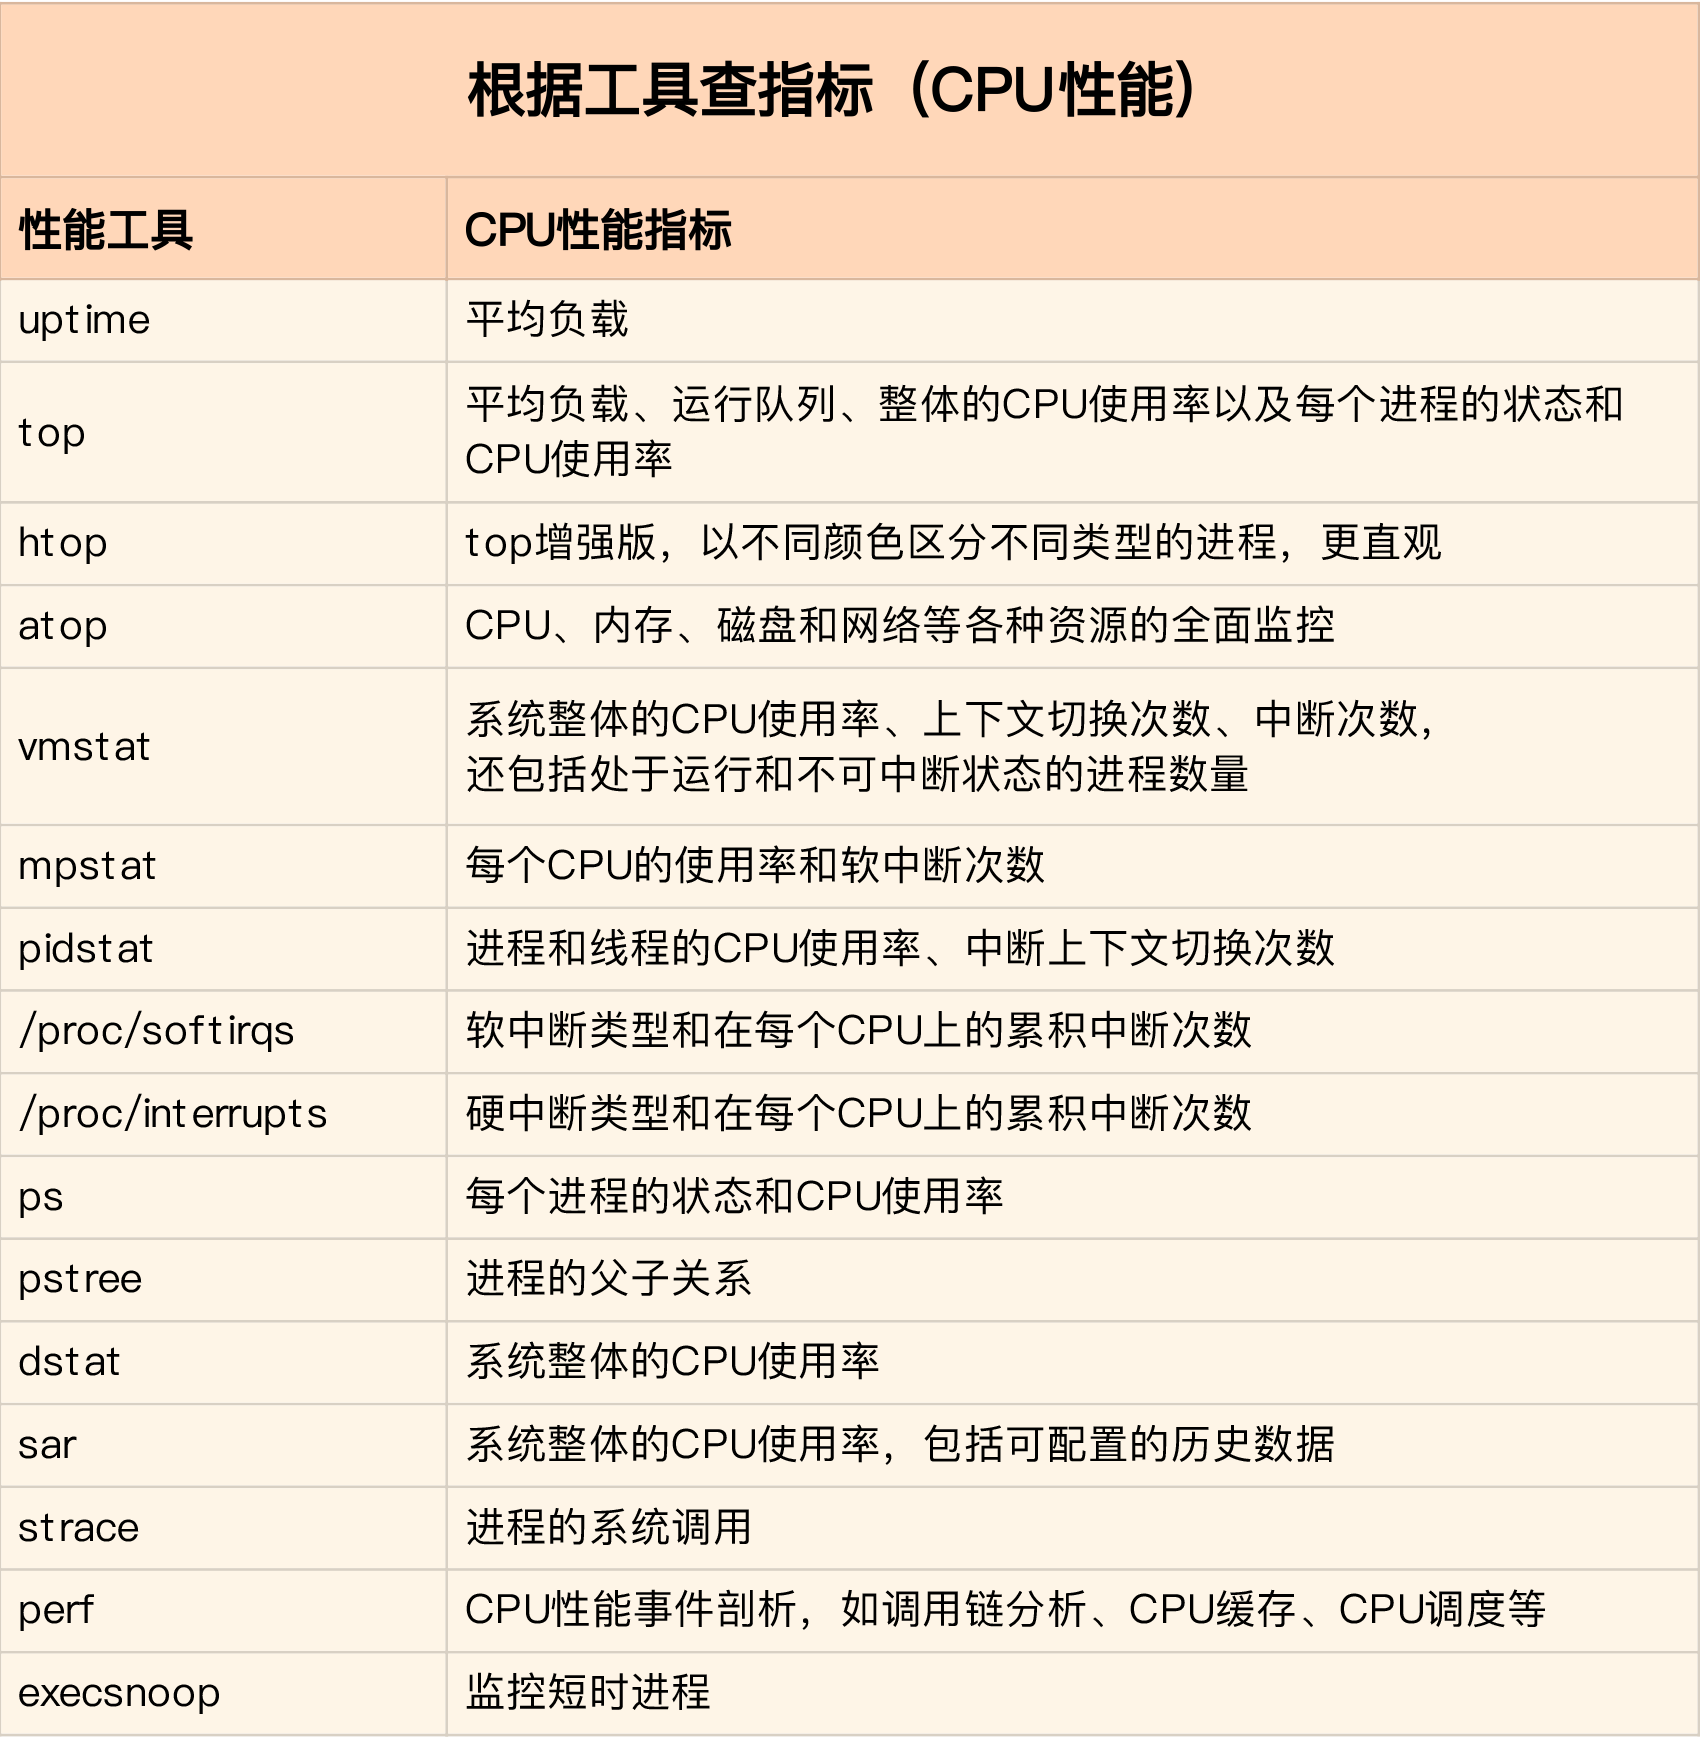
指标工具关联
相关命令
查看cpu核数:
1 | $ grep 'model name' /proc/cpuinfo | wc -l |
mpstat 查看 CPU 使用率的变化情况
1 | # -P ALL 表示监控所有 CPU,后面数字 5 表示间隔 5 秒后输出一组数据 |
pidstat查看具体进程cpu使用率
1 | # 间隔 5 秒后输出一组数据 |
vmstat内存分析工具,可以分析上下文切换情况
1 | # in中断 sc上下文切换 |
perl系能分析工具,可以追查引起性能问题的函数
1 | $ sudo perf top -g -p 30377 |
名词解释
平均负载
简单来说,平均负载是指单位时间内,系统处于可运行状态和不可中断状态的平均进程数,也就是平均活跃进程数,它和 CPU 使用率并没有直接关系。可运行状态顾名思义只得是正在运行的任务,不可中断状态例如等待cpu,等待IO。
cpu上下文
CPU寄存器和程序计数器为任务运行必备依赖环境,即为cpu上下文
cpu上下文切换包含哪些?
(1)进程上下文切换(2)线程上下文切换(3)中断上下文切换
知识点
- cpu使用率和平均负载一致吗?
不一定,当平均负载高的时候,任务主要是等待IO型,IO密集型任务,CPU使用率就不一定高。
注意
- pidstat中缺少%wait
centos中版本较低是,安装新版本即有
2. pidstat中%wait与top wa区别
pidstat 中, %wait 表示进程等待 CPU 的时间百分。
top 中 ,iowait%(简写wa) 则表示等待 I/O 的 CPU 时间百分。
Elasticsearch store探索
store是什么?
回答store是什么之前,先说一下正常使用es,我们的字段默认store:false,但是我们还是可以正常查出该数据的,那store:true有什么用呢?
默认情况下,字段值(index:true)以使其可搜索,但不会存储它们。这意味着可以查询该字段,但无法检索原始字段值。
通常这没关系。字段值已经是_source字段的一部分,默认情况下存储该字段。如果您只想检索单个字段或几个字段的值,而不是整个_source,则可以使用source filtering来实现。
现在我来说一下store是什么?字面意思是是否存储该数据,如果为true,则会单独存储该数据。如果_source 没有排除 exclude 掉这个字段,那么应该是会存储多份的。
如果你要求返回field1(store:true),es会分辨出field1已经被存储了,因此不会从_source中加载,而是从field1的存储块中加载
意义
当数据有title, date,a very large content,而只需要取回title, date,不用从很大的_source字段中抽取。这种场景下性能更高。
怎么使用?
1 | PUT my_index |
相关原理
当你将一个field的store属性设置为true,这个会在lucene层面处理。lucene是倒排索引,可以执行快速的全文检索,返回符合检索条 件的文档id列表。在全文索引之外,lucene也提供了存储字段的值的特性,以支持提供id的查询(根据id得到原始信息)。通常我们在lucene层 面存储的field的值是跟随search请求一起返回的(id+field的值)。es并不需要存储你想返回的每一个field的值,因为默认情况下每 一个文档的的完整信息都已经存储了,因此可以跟随查询结构返回你想要的所有field值。
有一些情况下,显式的存储某些field的值是必须的:当_source被disabled的时候,或者你并不想从source中parser来得到 field的值(即使这个过程是自动的)。
请记住:从每一个stored field中获取值都需要一次磁盘io,如果想获取多个field的值,就需要多次磁盘io,但是,如果从_source中获取多个field的值,则只 需要一次磁盘io,因为_source只是一个字段而已。所以在大多数情况下,从_source中获取是快速而高效的。
es中默认的设置_source是enable的,存储整个文档的值。这意味着在执行search操作的时候可以返回整个文档的信息。如果不想返回这个文 档的完整信息,也可以指定要求返回的field,es会自动从_source中抽取出指定field的值返回(比如说highlighting的需求)。
注意事项
哪些情形下需要显式的指定store属性呢?大多数情况并不是必须的。从_source中获取值是快速而且高效的。如果你的文档长度很长,存储 _source或者从_source中获取field的代价很大,
你可以显式的将某些field的store属性设置为true。缺点如上边所说:假设你存 储了10个field,而如果想获取这10个field的值,则需要多次的io,如果从_source中获取则只需要一次,而且_source是被压缩过 的
引用
算法篇之排序
初衷
为什么我要写算法篇,记得刚入大学的第一节课,老师就教我们软件=算法+数据结构,而我恰恰这两点学的最差了,学习这块两个初衷:1.阿里机试折腰,让我清楚的意识到自己的问题 2.职业瓶颈,已经工作四年了,知识面有了,但是缺乏深度。暂且先选择将基础算法打扎实点。
声明以下所有的定义不具有权威性,皆来自我对该算法的理解。
1.初级排序
1.1冒泡法
这大概是最简答的排序,可我一直是搞错的。
定义:将数组相邻的数进行对比,直到选出最大值或者最小值,每次冒出一个数,后面的逻辑不再处理它
实现:
1 | // 从小到大排序 |
N个数字要排序完成,总共进行N-1趟排序,每第 i 趟的排序次数为 (N-i) 次,所以可以用双重循环语句,外层控制循环多少趟,内层控制每一趟的循环次数。
按说算法是这样的确实没错,但是网络上还有另外一种写法,就是第一层循环N次,按说是结果不会错,但是算法多此一举。我想追究的是会不会多算一次。例如如下写法:
1 | // 从小到大排序 |
至于N次是否进行运算,我们就需要探讨当i=N-1时,是否进入第二个循环,当i=N-1时,第二个循环的条件就变成了j<N-1-(N-1)即j<0,这个永远不会成立,因此最后一次的循环不会进入二层循环。相对于正确算法只多了一次判断,性能可以忽略不计。
1.2选择排序法
1.2.1初阶选择排序法
定义:选取确定的数据依次与其他数据进行对比
实现:
1 | // 从小到大排序 |
1.2.2进阶选择排序法
定义:选取确定的数据依次与其他数据进行对比,但是和1.2.1区别在于内部循环只确定最大数的索引,数据交换是在外层循环做的。
实现:
1 | // 从小到大排序 |
该算法较1.2.1区别在于内部循环只确定最大数的索引,数据交换是在外层循环做的。少了多次交换,相较于前两种性能更好!
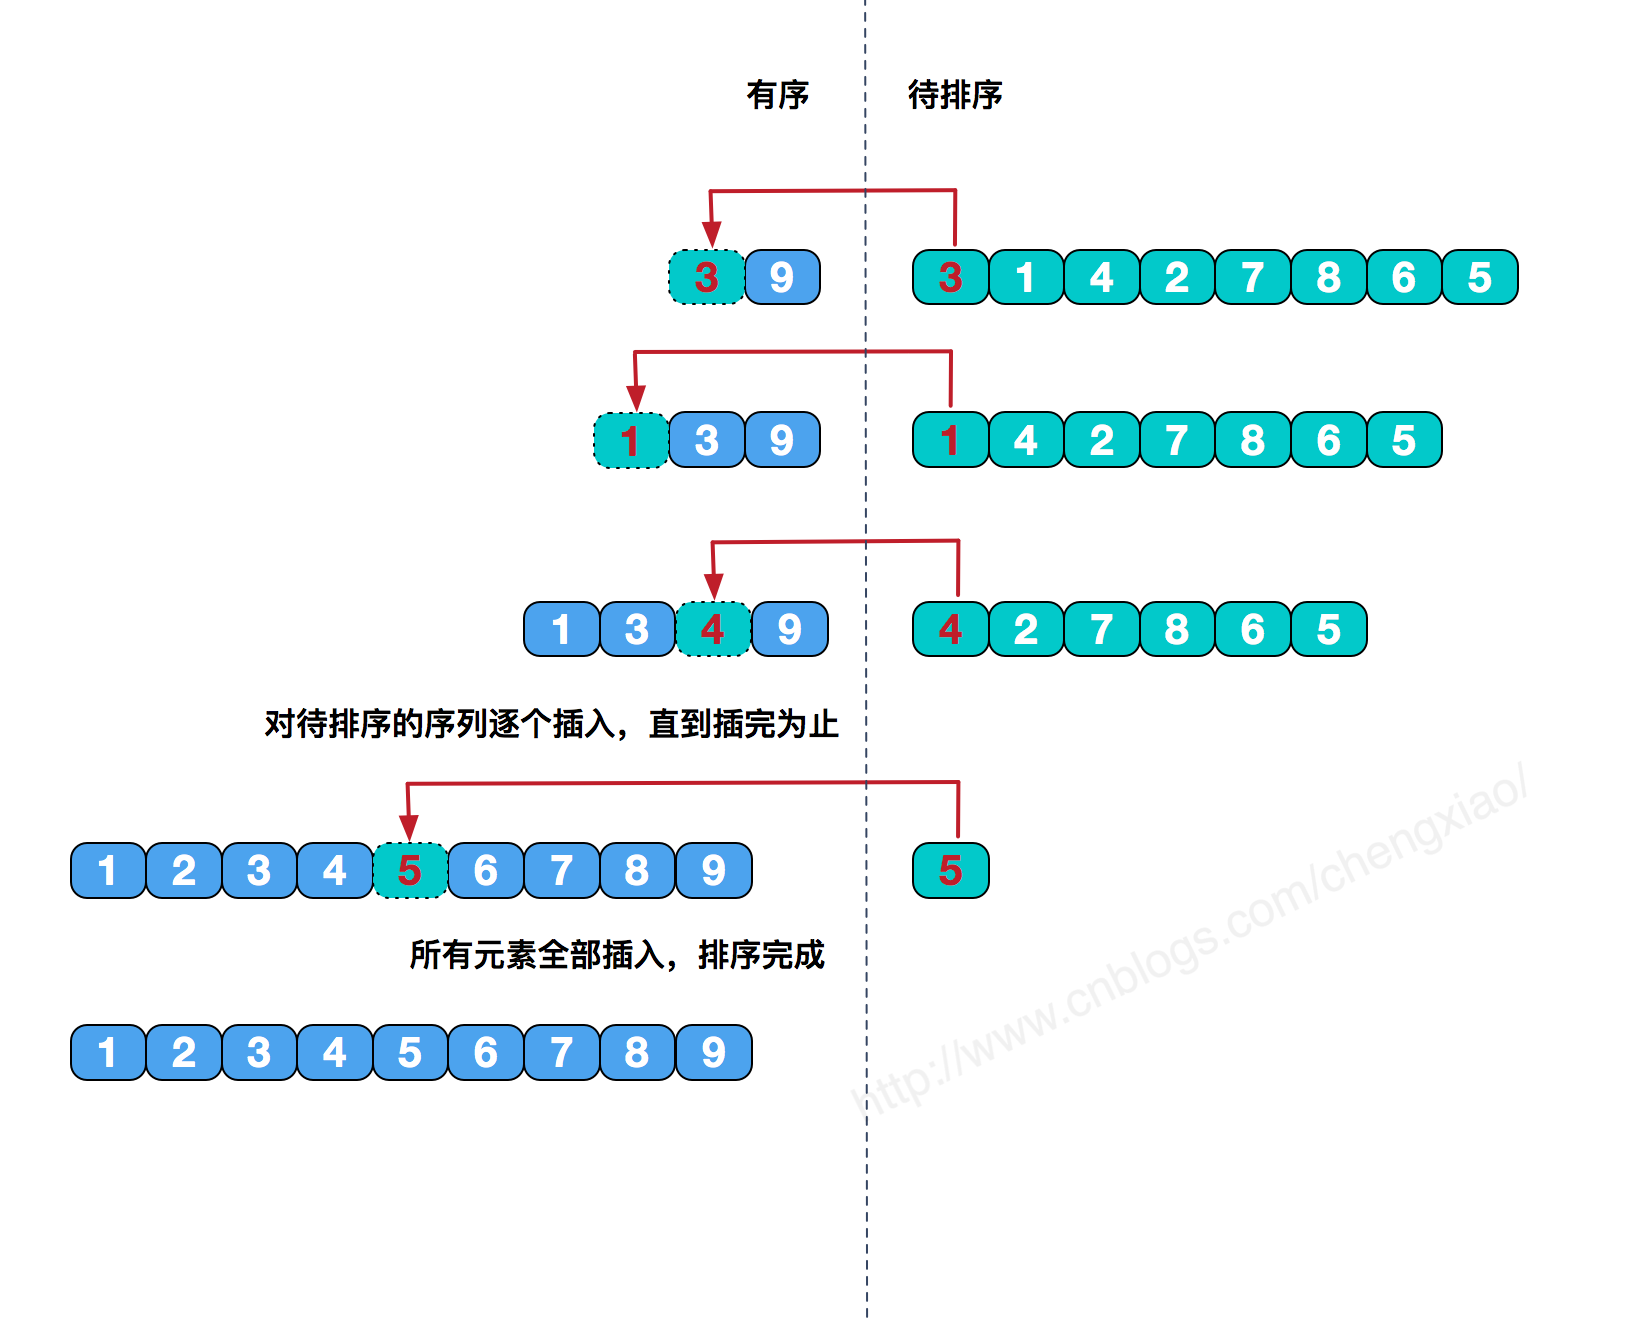
1.3插入排序
定义:像整理牌一样,将每一张牌插入到有序数组中适当的位置。左侧永远是有序的,当运行到数据最右端,即排序完毕,这种算法对于数组中部分数据是有序的话,性能会有很大的提升!
实现:
1 | // 从小到大排序 |
1.4希尔排序
定义:希尔排序是把记录按下标的一定增量分组,对每组使用直接插入排序算法排序;随着增量逐渐减少,每组包含的关键词越来越多,当增量减至1时,整个文件恰被分成一组,算法便终止
实现:
1 | // 从小到大排序 |
上面已经演示了以4为初始间隔对包含10个数据项的数组进行排序的情况。对于更大的数组开始的间隔也应该更大。然后间隔不断减小,直到间隔变成1。
举例来说,含有1000个数据项的数组可能先以364为增量,然后以121为增量,以40为增量,以13为增量,以4为增量,最后以 1为增量进行希尔排序。用来形成间隔的数列被称为间隔序列。这里所表示的间隔序列由Knuth提出,此序列是很常用的。在排序算法中,首先在一个短小的循环中使用序列的生成公式来计算出最初的间隔。h值最初被赋为1,然后应用公式h=3*h+1生成序列1,4,13,40,121,364,等等。当间隔大于数组大小的时候,这个过程停止。
1 | // 从小到大排序 |
这个也是正确的,间距为N/2
2.归并排序
定义:归并排序,也叫归并算法,指的是将两个顺序序列合并成一个顺序序列的方法
如 设有数列{6,202,100,301,38,8,1}
初始状态:6,202,100,301,38,8,1
第一次归并后:{6,202},{100,301},{8,38},{1},比较次数:3;
第二次归并后:{6,100,202,301},{1,8,38},比较次数:4;
第三次归并后:{1,6,8,38,100,202,301},比较次数:4;
总的比较次数为:3+4+4=11;
逆序数为14;
实现:
3.快速排序
4.堆排序
总结
参考
不回忆就再也想不起来
不回忆,就再也想不起了


毕业四年了,整整四年了,工作忙碌,生活奔波,没有就给我留下太多的时间去回忆,不回忆,就再也想不起来了。
想不起来刚进校园就因甲流被隔离的那一个月,那是快乐的一个月,没有学业,只有大学的新鲜,没有看不完的书,只有发不完的呆,再也不会有带着口罩满校溜达,回忆就像一扇窗,打开它,我能看到一副风景,风景中是我丢失的碎片记忆。
想不起大学的第一节课,想不到工作这么久,竟然干的工作多少还和它有点联系,烈日灼心,记忆中那节所在的教室在午后是那么的热,即使有空调,也感觉不到一丝凉意,它骨子里留给我的不是竞争,不是压力,即使我们有早操,即使我们下了下午的课,还得赶匆忙的晚自习,我骨子里是一个意志力很差的人,它教会了我坚持,不知道未来是什么样,只是依稀懂得需要坚持。
世间巧合万万个,最后一节课依然是那个教室,这大概就是所谓的缘分。回忆是件可怕的事,不想倒是没什么,一想瞬间千万片段释放,不知道是不是触电。物是人非,我离它直线距离不过5公里,可这么多年都未曾再去过,再也见不到熟悉的面孔,再也不能坐在教室里安奈躁动的心。
毕业的时候忙忙碌碌的,没有参加过毕业典礼,多么想再去补考,再参加一次毕业典礼。
毕业的时候来不及说再见的人有很多
React问题笔记
1.this 作用域处理方案
问题背景:手动触发事件,更改state中数据
- 箭头表达式render组件中调用
1
2
3
4
5
6
7
8
9
10
11
12mergeFilter(_this) {
let store = [];
if (!_this.state.merge) {
store = _this.mergetIndexName(this.state.indices, /[^a-z]+$/);
} else {
store = _this.reBuildOriginData(this.state.indices);
}
_this.setState({
store: store,
merge: !_this.state.merge,
});
}1
2
3
4
5
6
7
8<EuiSwitch
label="Merge"
key="MergeEuiSwitch"
checked={
this.state.merge
}
onChange={()=>this.mergeFilter(this)}
/> - bind
1
2
3
4
5
6
7
8
9
10
11
12
13
14
15
16
17
18
19
20
21
22
23
24
25
26
27constructor(props) {
super(props);
this.state = {value: 'coconut'};
this.handleChange = this.handleChange.bind(this);
}
handleChange(event) {
this.setState({value: event.target.value});
}
render() {
return (
<form onSubmit={this.handleSubmit}>
<label>
Pick your favorite flavor:
<select value={this.state.value} onChange={this.handleChange}>
<option value="grapefruit">Grapefruit</option>
<option value="lime">Lime</option>
<option value="coconut">Coconut</option>
<option value="mango">Mango</option>
</select>
</label>
<input type="submit" value="Submit" />
</form>
);
}
参考
metricbeat 新增kafka metrices 教程
项目背景
本次教程是编写metrices,开发moduel 基本差不多,可以参考creating-metricbeat-module。
本次教程是新增kafka metrices ,增加filesize metrices,实现的功能是根据配置的kafka 数据文件目录,获取所有topic,不同patition 数据文件大小,将该数据收集到elasticsearch中,通过kibana 根据不同粒度监控kafka集群。
正文
beats架构

项目生成
1 | cd metricbeat |
根据提示输入相应的内容,然后生成field.yml文件(make update),编辑metricbeat.yml文件 ,编译然后运行即可。。
配置写入字段类型及文件
cd filesize
- 编辑fields.yml
1
2
3
4
5
6
7
8
9
10
11
12
13
14
15
16
17
18- name: filesize
type: group
description: >
filesize
fields:
- name: topic
type: keyword
description: >
topic
- name: partition
type: long
description: >
partition
- name: filesize
type: long
description: >
topic data file size - 编辑docs.asciidoc
略
读取配置
1 | type MetricSet struct { |
指标采集
1 | func (m *MetricSet) Fetch(report mb.ReporterV2) { |
完整代码
1 | package filesize |
运行
- 编译
1
2make collect
make - 运行
1
./{beat} -e -d "*"
*代表选择输出的debug 日志,例如./metricset -e -d "kafka"输出kafka moduel 相关debug log
tip: 在field.yml有变化的时候,记得先执行make update,该命令会重写metricbeat.yml文件。
开发建议
可以使用如下代码做到debug日志
1 | var debugf = logp.MakeDebug("kafka") |
参考
beat开发环境搭建
前言
beats 是什么?Beats是您在服务器上作为代理安装的开源数据托运方,用于将操作数据发送到Elasticsearch。
elastc 官方提供的beats 有以下方面:
| Audit data | Auditbeat |
|---|---|
| Log files | Filebeat |
| Availability | Heartbeat |
| Metrics | Metricbeat |
| Network traffic | Packetbeat |
| Windows event logs | Winlogbeat |
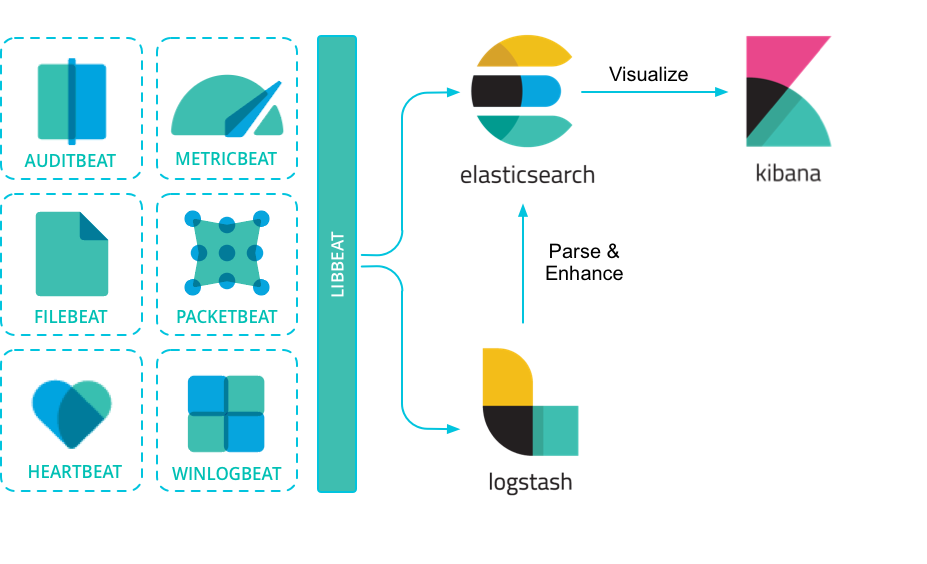
beats可以直接发送数据到Elasticsearch或通过Logstash,您可以在Kibana中进行可视化之前进一步处理和增强数据。
安装软件
安装新版 go
beats 是用go 语言写的,因此需要安装go
(1).配置GOROOT 例如:GOROOT=D:\Go</code>
(2).配置Path 环境中新增D:\Go\bin
(3).配置GOPATH GOPATH=D:\Go\GOPATH安装 Python 2
(1).安装python
(2).安装pip1
2wget https://bootstrap.pypa.io/get-pip.py
sudo python get-pip.py(3). virtualenv
virtualenv 用来生成支持make update1
pip install virtualenv
源码配置
1
2
3
mkdir -p ${GOPATH}/src/github.com/elastic
cd ${GOPATH}/src/github.com/elastic
git clone https://github.com/elastic/beats.git
切记上面配置地址路径,不然运行就会报错。
编译运行
- 编译
1
2
3make collect
make update
make - 运行
1
./{beat} -e -d "*"
*代表选择输出的debug 日志,例如./metricset -e -d "kafka"输出kafka moduel 相关debug log
注意事项
执行make update可以生成配置文件和文档,例如运行beat需要field.yml文件,即可由该你命令生成,但是切记,该命令也会重写{beat}.yml配置文件