from github import Github
import os
import codecs
def create(newfile):
    if not os.path.exists(newfile):
         f = open(newfile,'w')
         print newfile
         f.close()
    return
fileName='rct.txt'
respository='xaecbd/RCT'
g=Github("token",timeout=300)

repo=g.get_repo(respository)
stargazers=repo.get_stargazers_with_dates()
create(fileName)
with codecs.open(fileName,'a', 'utf-8') as f:
    for people in stargazers:
        print people.user.email
        if people.user.email is not None:
            if people.user.name is None:
                name = people.user.email
            else:
                name = people.user.name
            data=(name)+":"+(people.user.email)+"\r\n"
            f.write(data)
/** * 根据Jemalloc 估算分配内存大小 Small: All 2^n-aligned allocations of size 2^n will incur * no additional overhead, due to how small allocations are aligned and packed. * Small: [8], [16, 32, 48, ..., 128], [192, 256, 320, ..., 512], [768, 1024, * 1280, ..., 3840] Large: The worst case size is half the chunk size, in which * case only one allocation per chunk can be allocated. If the remaining * (nearly) half of the chunk isn't otherwise useful for smaller allocations, * the overhead will essentially be 50%. However, assuming you use a diverse * mixture of size classes, the actual overhead shouldn't be a significant issue * in practice. Large: [4 KiB, 8 KiB, 12 KiB, ..., 4072 KiB] Huge: Extra virtual * memory is mapped, then the excess is trimmed and unmapped. This can leave * virtual memory holes, but it incurs no physical memory overhead. Earlier * versions of jemalloc heuristically attempted to optimistically map chunks * without excess that would need to be trimmed, but it didn't save much system * call overhead in practice. Huge: [4 MiB, 8 MiB, 12 MiB, ..., 512 MiB] * * @param size * @return */ public static long assign(long size) { if (size <= 4096) { // Small if (is_power2(size)) { return size; } else if (size < 128) { return min_ge(array16, size); } else if (size < 512) { return min_ge(array192, size); } else { return min_ge(array768, size); } } else if (size < 4194304) { // Large return min_ge(array4096, size); } else { // Huge return min_ge(array4194304, size); } }
/** * 创建一个long数组 * * @param start * @param stop * @param step * @return */ public static long[] range(int start, int stop, int step) { int size = (stop - 1 - start) / step + 1; long[] array = new long[size]; int index = 0; for (int i = start; i < stop; i = i + step) { array[index] = i; index++; } return array; }
public static long min_ge(long[] srcArray, long key) { int index = binarySearch(srcArray, key); return srcArray[index]; }
// 二分查找最小值,即最接近要查找的值,但是要大于该值 public static int binarySearch(long srcArray[], long key) { int mid = (0+srcArray.length-1) / 2; if (key == srcArray[mid]) { return mid; }
private static final long redisObject = (long)(8 + 8); // 一个dictEntry,24字节,jemalloc会分配32字节的内存块 private static final long dicEntry = (long)(2 * 8 + 8 + 8); private static final String patternString = "^[-\\\\+]?[\\\\d]*$";
private static long skiplistMaxLevel = 32; private static long redisSharedInterges = 10000; private static long longSize = 8; private static long pointerSize = 8;
/** * 一个SDS结构占据的空间为:free所占长度+len所占长度+ buf数组的长度=4+4+len+1=len+9 * * @param length * @return */ private static long sds(long length) { long mem = 9 + length; return mem; }
/** * * 计算 string byte 大小 * * @param kv * https://searchdatabase.techtarget.com.cn/wp-content/uploads/res/database/article/2011/2011-11-14-16-56-18.jpg * @return */ public static long CalculateString(KeyStringValueString kv) { long mem = KeyExpiryOverhead(kv); mem = dicEntry + SizeofString(kv.getRawKey()); mem = mem + redisObject + SizeofString(kv.getValueAsString()); return mem; }
public static long CalculateLinkedList(KeyStringValueList kv) { long mem = KeyExpiryOverhead(kv); mem = mem + SizeofString(kv.getRawKey()); mem = mem + redisObject; mem = mem + dicEntry; long length = kv.getValueAsStringList().size(); mem = mem + LinkedListEntryOverhead() * length; mem = mem + LinkedlistOverhead(); mem = mem + redisObject * length; for (String value : kv.getValueAsStringList()) { mem = mem + SizeofString(value); }
return mem; }
public static long CalculateZipList(KeyStringValueList kv) { long mem = KeyExpiryOverhead(kv); mem = mem + dicEntry; mem = mem + SizeofString(kv.getRawKey()); mem = mem + redisObject; long length = kv.getValueAsStringList().size(); mem = mem + ZiplistOverhead(length); for (String value : kv.getValueAsStringList()) { mem = mem + ZiplistAlignedStringOverhead(value); }
return mem; }
public static long CalculateHash(KeyStringValueHash kv) { long mem = KeyExpiryOverhead(kv); mem = mem + SizeofString(kv.getRawKey()); mem = mem + redisObject; mem = mem + dicEntry; long length = kv.getValueAsHash().size(); mem = mem + HashtableOverhead(length);
for (String key : kv.getValueAsHash().keySet()) { String value = kv.getValueAsHash().get(key); mem = mem + SizeofString(key); mem = mem + SizeofString(value); mem = mem + 2 * redisObject; mem = mem + HashtableEntryOverhead(); }
return mem; }
public static long CalculateSet(KeyStringValueSet kv) { long mem = KeyExpiryOverhead(kv);
mem = mem + SizeofString(kv.getRawKey()); mem = mem + redisObject; mem = mem + dicEntry; long length = kv.getValueAsSet().size(); mem = mem + HashtableOverhead(length); mem = mem + redisObject * length;
for (String value : kv.getValueAsSet()) { mem = mem + SizeofString(value); mem = mem + 2 * redisObject; mem = mem + HashtableEntryOverhead(); }
return mem; }
public static long CalculateIntSet(KeyStringValueSet kv) { long mem = KeyExpiryOverhead(kv); mem = mem + dicEntry; mem = mem + SizeofString(kv.getRawKey()); mem = mem + redisObject; long length = kv.getValueAsSet().size(); mem = mem + IntsetOverhead(length);
for (String value : kv.getValueAsSet()) { mem = mem + ZiplistAlignedStringOverhead(value); }
return mem; }
public static long CalculateZSet(KeyStringValueZSet kv) { long mem = KeyExpiryOverhead(kv);
mem = mem + SizeofString(kv.getRawKey()); mem = mem + redisObject; mem = mem + dicEntry; long length = kv.getValueAsSet().size(); mem = mem + SkiplistOverhead(length); mem = mem + redisObject * length;
for (ZSetEntry value : kv.getValueAsZSet()) { mem = mem + 8; mem = mem + SizeofString(value.getElement()); // TODO 还有个 score mem = mem + 2 * redisObject; mem = mem + SkiplistEntryOverhead(); }
return mem; }
// TopLevelObjOverhead get memory use of a top level object // Each top level object is an entry in a dictionary, and so we have to include // the overhead of a dictionary entry public static long TopLevelObjOverhead() { return HashtableEntryOverhead(); }
/** * SizeofString get memory use of a string * https://github.com/antirez/redis/blob/unstable/src/sds.h * * @param bytes * @return */ public static long SizeofString(byte[] bytes) { String value = new String(bytes);
if (isInteger(value)) { try { Long num = Long.parseLong(value); if (num < redisSharedInterges && num > 0) { return 0; } return 8; } catch (NumberFormatException e) { } }
return Jemalloc.assign(sds(bytes.length)); }
public static long SizeofString(String value) { if (isInteger(value)) { try { Long num = Long.parseLong(value); if (num < redisSharedInterges && num > 0) { return 0; } return 8; } catch (NumberFormatException e) { } }
return Jemalloc.assign(sds(value.length())); }
public static long DictOverhead(long size) { return Jemalloc.assign(56 + 2*pointerSize + nextPower(size) * 3*8); }
/** * 过期时间也是存储为一个 dictEntry,时间戳为 int64; * * @param kv * @return */ // KeyExpiryOverhead get memory useage of a key expiry // Key expiry is stored in a hashtable, so we have to pay for the cost of a // hashtable entry // The timestamp itself is stored as an int64, which is a 8 bytes @SuppressWarnings("rawtypes") public static long KeyExpiryOverhead(KeyValuePair kv) { // If there is no expiry, there isn't any overhead if (kv.getExpiredType() == ExpiredType.NONE) { return 0; } return HashtableEntryOverhead() + 8; }
// HashtableEntryOverhead get memory use of hashtable entry // See https://github.com/antirez/redis/blob/unstable/src/dict.h // Each dictEntry has 2 pointers + int64 public static long HashtableEntryOverhead() { return 2 * pointerSize + 8; }
public static long ZiplistOverhead(long size) { return Jemalloc.assign(12 + 21 * size); }
public static long ZiplistAlignedStringOverhead(String value) { try { Long.parseLong(value); return 8; } catch (NumberFormatException e) { } return Jemalloc.assign(value.length()); }
// LinkedlistOverhead get memory use of a linked list // See https://github.com/antirez/redis/blob/unstable/src/adlist.h // A list has 5 pointers + an unsigned long public static long LinkedlistOverhead() { return longSize + 5 * pointerSize; }
// LinkedListEntryOverhead get memory use of a linked list entry // See https://github.com/antirez/redis/blob/unstable/src/adlist.h // A node has 3 pointers public static long LinkedListEntryOverhead() { return 3 * pointerSize; }
// SkiplistOverhead get memory use of a skiplist public static long SkiplistOverhead(long size) { return 2 * pointerSize + HashtableOverhead(size) + (2 * pointerSize + 16); }
// SkiplistEntryOverhead get memory use of a skiplist entry public static long SkiplistEntryOverhead() { return HashtableEntryOverhead() + 2 * pointerSize + 8 + (pointerSize + 8) * zsetRandLevel(); }
public static long nextPower(long size) { long power = 1; while (power <= size) { power = power << 1; } return power; }
public static long zsetRandLevel() { long level = 1; int rint = new Random().nextInt(65536); int flag = 65535 / 4; while (rint < flag) {// skiplistP level++; rint = new Random().nextInt(65536); } if (level < skiplistMaxLevel) { return level; } return skiplistMaxLevel; }
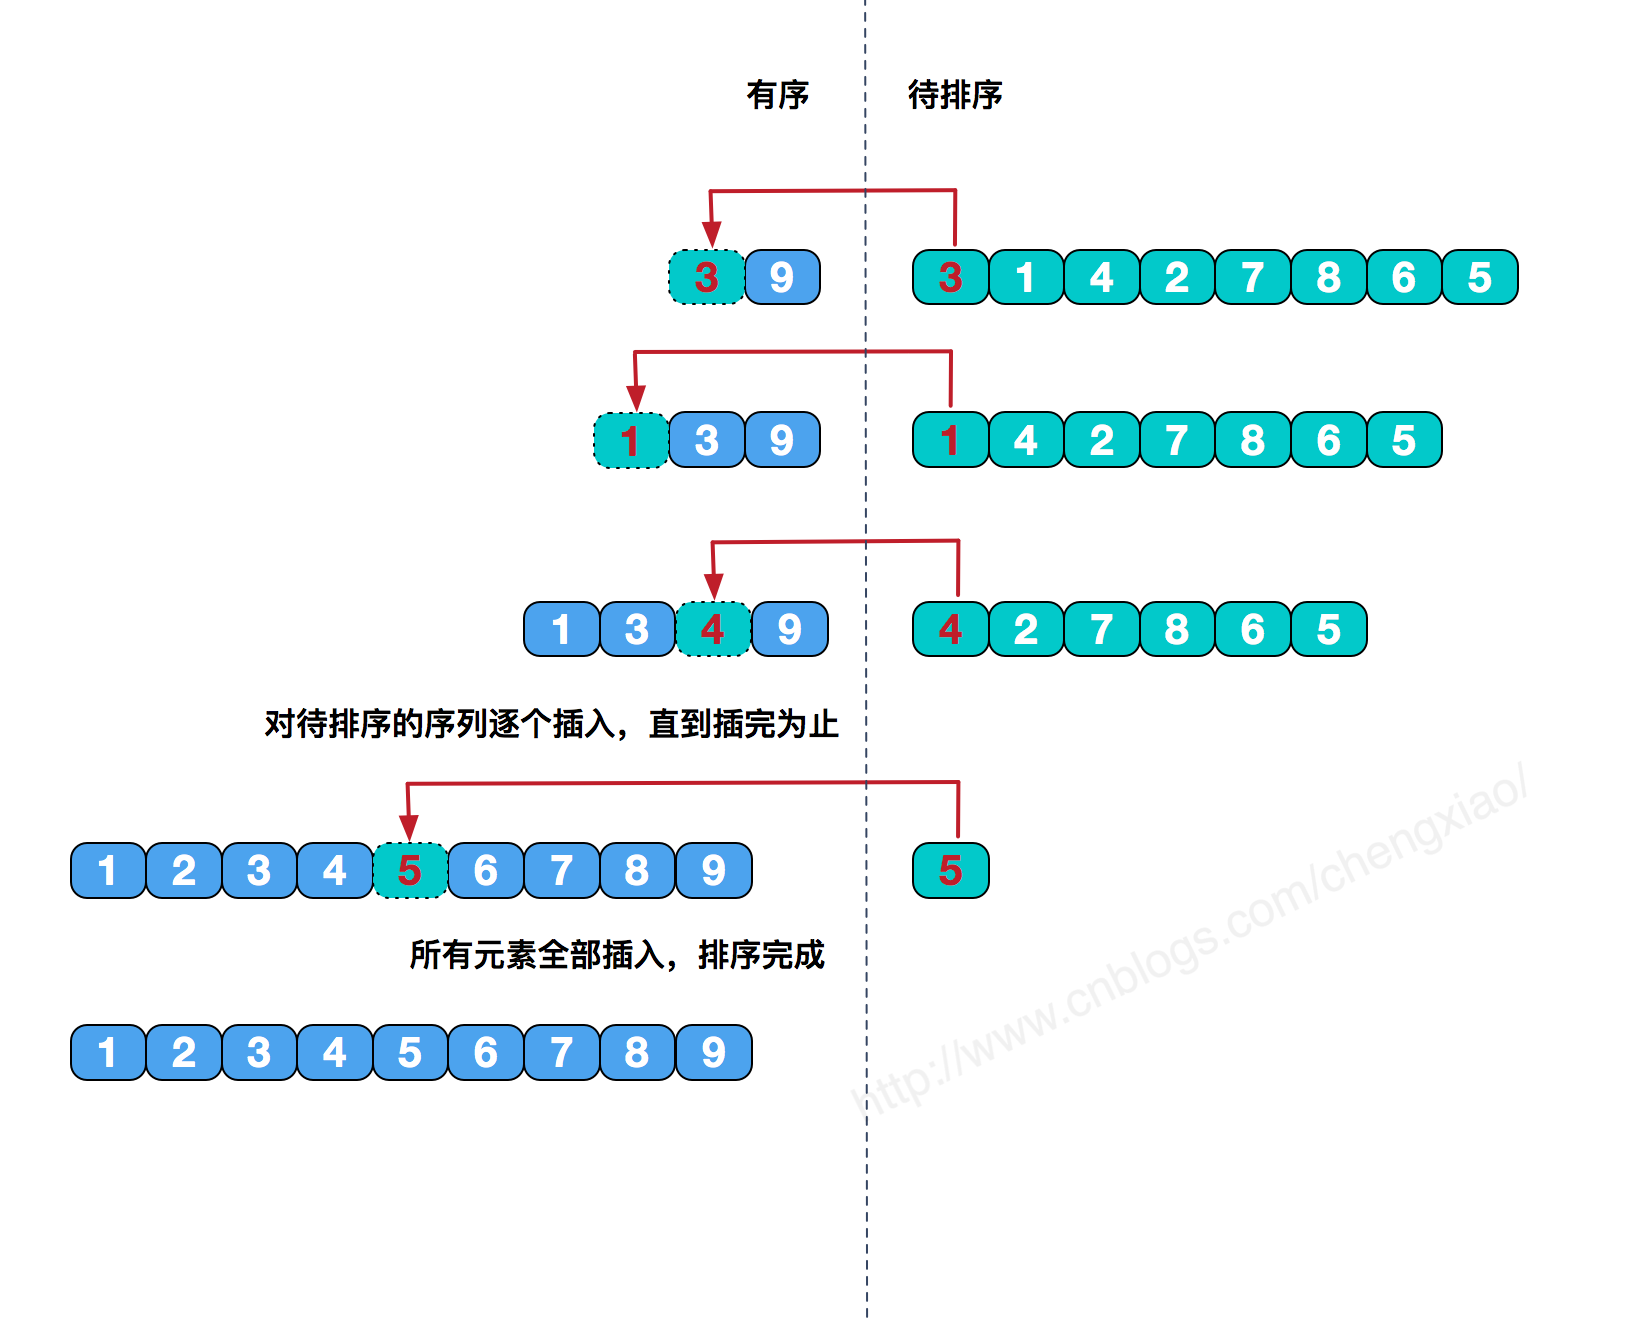
// 从小到大排序
for (int i = 0; i < wait2Sort.length-1; i++) {
	int min = i;
	for (int j = i + 1; j < wait2Sort.length; j++) {
		if (wait2Sort[min] > wait2Sort[j]) {
			min = j;
		}
	}

	if (min != i) {
		int temp = wait2Sort[min];
		wait2Sort[min] = wait2Sort[i];
		wait2Sort[i] = temp;
	}
}


.png?raw=true)