1. KSQL是什么? KSQL是Apache Kafka的流式SQL引擎,让你可以SQL语方式句执行流处理任务。KSQL降低了数据流处理这个领域的准入门槛,为使用Kafka处理数据提供了一种简单的、完全交互的SQL界面。你不再需要用Java或Python之类的编程语言编写代码了!KSQL具有这些特点:开源(采用Apache 2.0许可证)、分布式、可扩展、可靠、实时。它支持众多功能强大的数据流处理操作,包括聚合、连接、加窗(windowing)和sessionization (捕获单一访问者的网站会话时间范围内所有的点击流事件)等等。
2. KSQL能解决什么问题?
Apache Kafka是为数据管道的流行选择。 KSQL使得在管道中转换数据变得简单,准备好消息以便在另一个系统中干净地着陆。
通过快速构建实时仪表板,生成指标以及创建自定义警报和消息,跟踪,了解和管理基础架构,应用程序和数据源。
在Kafka中导航并浏览您的数据。
通过毫秒级延迟识别模式并发现实时数据中的异常,使您能够正确地表现出异常事件并分别处理欺诈活动。
为用户创建数据驱动的实时体验和洞察力。
理解并提供传感器数据的方式和位置。
通过各种渠道全面了解客户的每一次互动,实时不断地整合新信息。
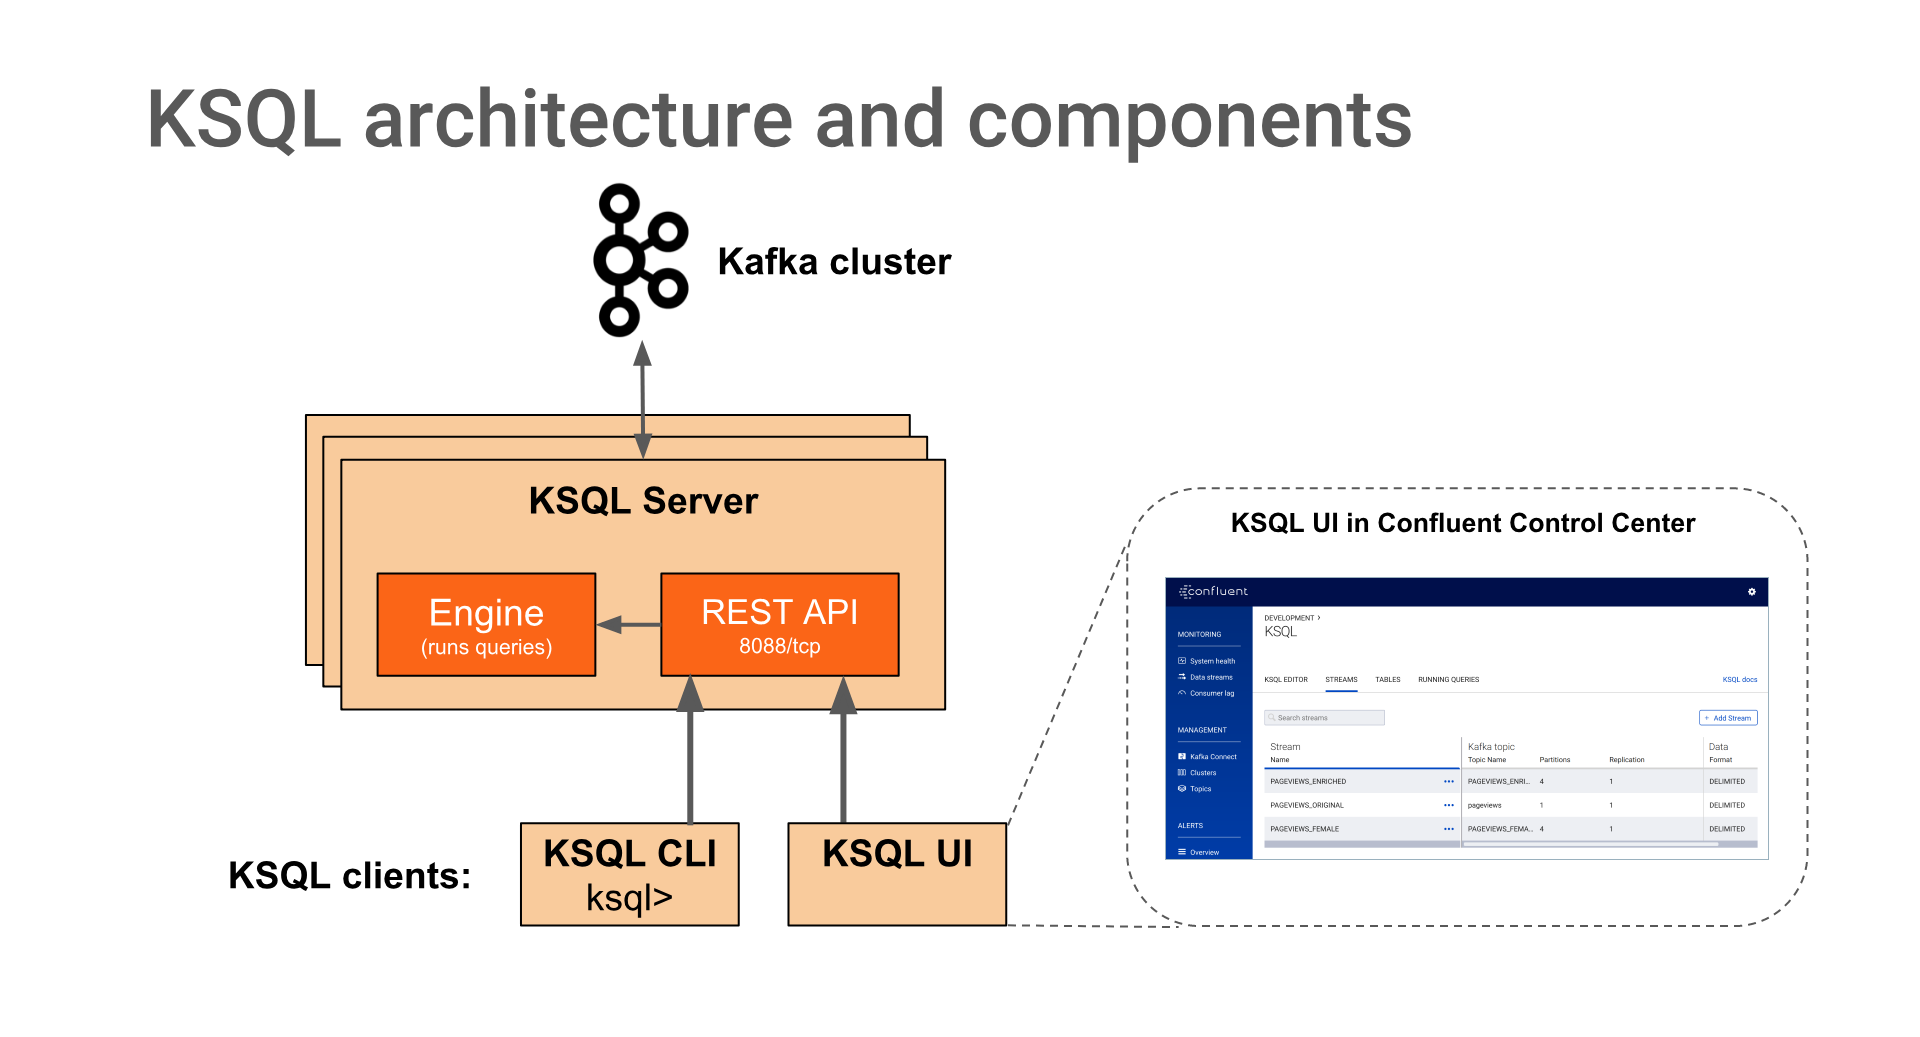
3.KSQL架构及组件
KSQL服务器运行执行KSQL查询的引擎。这包括处理,读取和写入目标Kafka集群的数据。 KSQL服务器构成KSQL集群,可以在容器,虚拟机和裸机中运行。您可以在实时操作期间向/从同一KSQL群集添加和删除服务器,以根据需要弹性扩展KSQL的处理能力。您可以部署不同的KSQL集群以实现工作负载隔离。
你可以使用KSQL命令行界面(CLI)以交互方式编写KSQL查询。 KSQL CLI充当KSQL服务器的客户端。对于生产方案,您还可以将KSQL服务器配置为以非交互式“无头”配置运行,从而阻止KSQL CLI访问。
KSQL服务器,客户端,查询和应用程序在Kafka brokers之外,在单独的JVM实例中运行,或者在完全独立的集群中运行。
4. 入门教程 4.1 数据类型及术语 4.1.1 数据类型
BOOLEAN
INTEGER
BIGINT
DOUBLE
VARCHAR (or STRING)
ARRAY (JSON and AVRO only. Index starts from 0)
MAP<VARCHAR, ValueType> (JSON and AVRO only)
STRUCT<FieldName FieldType, …> (JSON and AVRO only) The STRUCT type requires you to specify a list of fields.
4.1.2 术语
流是结构化数据的无界序列。例如,我们可以进行一系列金融交易,例如“Alice向Bob发送了100美元,然后Charlie向Bob发送了50美元”。流中的事实是不可变的,这意味着可以将新事实插入到流中,但是现有事实永远不会被更新或删除。可以从Kafka主题创建流,也可以从现有流派生流。流的基础数据在topic中持久存储(持久化)
表是流或其他表的视图,表示不断变化的事实的集合。例如,我们可以有一个表格,其中包含最新的财务信息,例如“Bob的当前账户余额为150美元”。它相当于传统的数据库表,但通过流式语义(如窗口)进行了丰富。表中的事实是可变的,这意味着可以将新事实插入表中,并且可以更新或删除现有事实。可以从Kafka主题创建表,也可以从现有流和表派生表。在这两种情况下,表的基础数据都在topic中持久存储(持久化)。
在KSQL 5.0及更高版本中,您可以使用CREATE STREAM和CREATE TABLE语句中的STRUCT类型以Avro和JSON格式读取嵌套数据。
CREATE STREAM/TABLE (from a topic)
CREATE STREAM/TABLE AS SELECT (from existing streams/tables)
SELECT (non-persistent query)
例如
1 2 3 4 5 CREATE STREAM orders ( orderId BIGINT, address STRUCT<street VARCHAR, zip INTEGER>) WITH (...); SELECT address->city, address->zip FROM orders;
DAY, DAYS
HOUR, HOURS
MINUTE, MINUTES
SECOND, SECONDS
MILLISECOND, MILLISECONDS
4.2 如何使用? 目前confluent KSQL支持两种方式,一种是ksql-cli,一种是rest
ksql-cli 这里我仅演示使用docker方式
1 2 3 4 5 6 7 8 9 10 11 12 13 14 15 16 17 18 19 20 21 22 23 24 25 26 27 28 sudo docker run -it --rm confluentinc/cp-ksql-cli:5.1.2 http://192.168.0.11:8088 [sudo] password for bigdata: =========================================== = _ __ _____ ____ _ = = | |/ // ____|/ __ \| | = = | ' /| (___ | | | | | = = | < \___ \| | | | | = = | . \ ____) | |__| | |____ = = |_|\_\_____/ \___\_\______| = = = = Streaming SQL Engine for Apache Kafka® = =========================================== Copyright 2017-2018 Confluent Inc. CLI v5.1.2, Server v5.1.2 located at http://192.168.0.11:8088 Having trouble? Type 'help' (case-insensitive) for a rundown of how things work! ksql> show streams; Stream Name | Kafka Topic | Format ------------------------------------------------------ EC_BOT_DETECTION | EC_bot_detection.replica | JSON DEMO | trumantest | JSON ------------------------------------------------------
rest 1 2 3 4 curl --request POST \ --url http://192.168.0.11:8088/ksql \ --header 'Content-Type: application/vnd.ksql.v1+json; charset=utf-8' \ --data '{\r\n "ksql": "LIST STREAMS;",\r\n "streamsProperties": {}\r\n}'
rest主要有两个接口1.ksql2.query,对于一般查询语句可以使用query接口。其他的命令操作一般使用ksql接口。
4.3 快速指南 4.3.1 常用支持命令
命令
描述
CREATE STREAM
CREATE TABLE
CREATE STREAM AS SELECT
CREATE TABLE AS SELECT
INSERT INTO
DESCRIBE
DESCRIBE FUNCTION
EXPLAIN
DROP STREAM [IF EXISTS] [DELETE TOPIC];
DROP TABLE [IF EXISTS] [DELETE TOPIC];
PRINT
SELECT
在select下支持更多sql语法,这里不一一列出
SHOW FUNCTIONS
SHOW TOPICS
SHOW STREAMS
SHOW TABLES
SHOW QUERIES
列出持久化查询
4.3.2 KSQL Language Elements
DDL包括以下:
CREATE STREAM
CREATE TABLE
DROP STREAM
DROP TABLE
CREATE STREAM AS SELECT (CSAS)
CREATE TABLE AS SELECT (CTAS)
DML包括以下:
SELECT
INSERT INTO
CREATE STREAM AS SELECT (CSAS)
CREATE TABLE AS SELECT (CTAS)
4.3.3 Time and Windows in KSQL KSQL支持时间窗口操作,以下是目前支持的几种类型:
Window type
行为
描述
Hopping Window
基于时间
固定持续时间,重叠的窗口
Tumbling Window
基于时间
固定持续时间,非重叠,无间隙窗口
Session Window
基于session
动态大小,不重叠,数据驱动的窗口
4.4 使用案例 案例场景 这里我演示一个反爬虫检测的案例, 根据EC_bot_detection的数据抓取一分钟内超过限制的IP.
创建stream 根据消费kafka中EC_bot_detection.replica数据,定义不同字段的数据类型,按照该数据定义语句如下
1 CREATE STREAM ec_bot_detection (action VARCHAR, nvtc VARCHAR,nid VARCHAR,ip VARCHAR,msg VARCHAR,level VARCHAR,verb VARCHAR,url VARCHAR,purl VARCHAR,ua VARCHAR,valid INTEGER,nNvtc VARCHAR,nNid VARCHAR,cip VARCHAR,sip VARCHAR,xpost VARCHAR,time VARCHAR,id VARCHAR,xprotocol VARCHAR,xhost VARCHAR,xport VARCHAR,xpath VARCHAR,xquery VARCHAR,xpathalias VARCHAR,xkey VARCHAR,importance INTEGER,xpprotocol VARCHAR,xphost VARCHAR,xpport VARCHAR,xppath VARCHAR,xpquery VARCHAR,org VARCHAR,cyc VARCHAR,isp VARCHAR,cycName VARCHAR,region VARCHAR,city VARCHAR,geoLocation VARCHAR,zipcode VARCHAR) WITH (VALUE_FORMAT = 'JSON',KAFKA_TOPIC = 'EC_bot_detection.replica');
自定义sql 查询语句
1 SELECT ip,org,cyc,count(1) as ccount FROM EC_BOT_DETECTION WINDOW TUMBLING (SIZE 60 SECONDS) WHERE xhost not like '%.tw' and level='-1' AND importance=1 AND (msg<>'W' OR msg is null) and action like'crawler%' AND ip NOT LIKE '127.0.0.1' AND ip NOT LIKE '172.16.%' AND ip <> '' AND xpathalias !='LandingpageOverviewcontent4mobile' AND xpathalias !='CommonCommonrecaptchavalidate' GROUP BY ip,org,cyc HAVING count(1)>300;
输出结果 为了将查询结果存储到kafka中,我们可以使用
CREATE TABLE TableName as SELECT …
1 2 CREATE TABLE bot_detection_1min as SELECT ip,org,cyc,count(1) as ccount FROM EC_BOT_DETECTION WINDOW TUMBLING (SIZE 60 SECONDS) WHERE xhost not like '%.tw' and level='-1' AND importance=1 AND (msg<>'W' OR msg is null) and action like'crawler%' AND ip NOT LIKE '127.0.0.1' AND ip NOT LIKE '172.16.%' AND ip <> '' AND xpathalias !='LandingpageOverviewcontent4mobile' AND xpathalias !='CommonCommonrecaptchavalidate' GROUP BY ip,org,cyc HAVING count(1)>300;
总结
having不支持别名,可以直接使用聚合函数。例如 HAVING count(1)>300
count(distinct xkey)不支持,可以使用自定义函数(array_length)实现数组求大小。例如 array_length(COLLECT_SET(xkey))
not in不支持,可以使用!=替换
4.5 高阶应用之自定义函数 目前官方提供的函数不足以满足业务场景的需求情况下,我们可以扩展自定义函数udf/udaf
4.5.1 udf函数 用户自定义函数,可以实现针对column操作的函数,例如以下案例,实现字母转大写
1 2 3 4 5 6 7 8 @UdfDescription(name = "upper", description = "字符串转大写") public class Upper { @Udf public String upper(final String column) { return column.toUpperCase(); } }
4.5.2 udaf函数 用户自定义聚合函数,以下是聚合求百分比函数demo
1 2 3 4 5 6 7 8 9 10 11 12 13 14 15 16 17 18 19 20 21 22 23 24 25 26 27 28 29 30 31 32 33 34 35 36 37 38 39 40 41 42 43 44 45 46 47 48 49 @UdafDescription(name = "percent", description = "聚合求百分比") public class Percent { @UdafFactory(description = "statistics percent") public static Udaf<Integer, Map<String, Double>> createStddev() { return new Udaf<Integer, Map<String, Double>>() { @Override public Map<String, Double> initialize() { Map<String, Double> stats = new HashMap<>(); stats.put("sum", 0.0); stats.put("bussiness", 0.0); stats.put("percent", 0.0); return stats; } @Override public Map<String, Double> aggregate(final Integer val, final Map<String, Double> aggregateValue) { Double sum = aggregateValue.getOrDefault("sum", 0.0) + 1; Double bussiness = aggregateValue.getOrDefault("bussiness", 0.0); if (val % 4 == 0) { bussiness = bussiness + 1; } Double percent = bussiness / sum; Map<String, Double> agg = new HashMap<>(); agg.put("sum", sum); agg.put("bussiness", bussiness); agg.put("percent", percent); return agg; } @Override public Map<String, Double> merge(final Map<String, Double> aggOne, final Map<String, Double> aggTwo) { Double sum = aggOne.getOrDefault("sum", 0.0) + aggTwo.getOrDefault("sum", 0.0); Double bussiness = aggOne.getOrDefault("bussiness", 0.0) + aggTwo.getOrDefault("bussiness", 0.0); Double percent = bussiness / sum; Map<String, Double> agg = new HashMap<>(); agg.put("sum", sum); agg.put("bussiness", bussiness); agg.put("percent", percent); return agg; } }; } }
5. 已知问题 通过两周ksql的使用,现发现有如下问题不能满足
distinct1 2 select distinct ip from #table; select count(distinct ip) from #table
sub query1 select ip from (select * from table);
case when1 sum(case when nvtc='' then 1 else 0 end)
in/not in1 xpathalias not in ('Landingpage','Wishlist','CommonMessagepage','Common')
6.参考
KSQL KSQL REST API Reference KSQL Syntax Reference Time and Windows in KSQL KSQL Custom Function Reference (UDF and UDAF)